| Applies To | |
| Product(s): | OpenPlant Modeler CONNECT Edition Update 8 |
| Version(s): |
10.08.00.51 |
| Environment: | Windows 10 (64-bit) |
| Area: | Schema Customization |
| Subarea: | PlantSight Integrated WorkSet |
| Original Author: | Deepak Singh, Bentley Product Advantage Group |
In OpenPlant Modeler, requirement is to know about, how to push new schema changes to already provisioned workset for OpenPlant Modeler.
Background
Upon Associate & Schema provision for OpenPlant Modeler workset all the configured schema changes pushed to iModel of PlantSight project. During the course of time based on project need, requirement is to push new schema customization. In the wiki article, we will create a new associated item class for Pipeline & created pipeline should show hierarchy in PlantSight Visualizer as well.
Steps to Accomplish
- Load OpenPlant Project Administrator CONNECT Edition.
- Select desired workset, expand it & select OpenPlant Modeler product.
- Click on Settings ribbon tab & select Schema Editor. Refer sequential steps as shown.
- In Schema Configuration dialog, ensure that selected schema is OpenPlant, search Plant Breakdown Element Right mouse & select Add Derived Class as shown below.
Note: To implement schema changes in PlantSight imodel, we need to ensure that changes are available in both the schema functional (OpenPlant) and physical (OpenPlant 3D) schema. - Enter desired class name, here Track Number as shown below. Once done, click on OK to proceed.
- Click on Save to save the schema changes done in OpenPlant schema. Refer image as shown below.

- From same Schema Configuration dialog, ensure to select the OpenPlant 3D schema & add same class TRACK_NUMBER as derived class under Plant Breakdown Element Refer image as shown below.

- From Properties tab, select the NAME property & mark it as business key property. Refer sequential steps as shown below.

- Click on Save to save all the changes.
- For selected workset, evoke Property Display. Refer image as shown below.

- Ensure that Name property is Editable. If it is read-only, make it to editable & save all the changes.
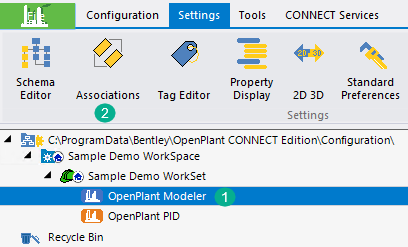
- Select OpenPlant Modeler application icon & click on Associations as shown below.
- From Schema Configuration dialog, select green add icon as shown below.
- Search your desired class and click on Select Class as shown below.

- To include Pipeline, Equipment, HVAC System & Trayline classes as child associated class, hold right click on Plant Area class & drag it over to Track Number. Release the right mouse, this will prompt two options, select Copy Children option as shown below.

- Once Copy Children is selected, application will prompt to define relationship between newly added associated item class (Track Number) & rest of classes like Pipeline, Equipment, HVAC System & Trayline.
- Enter desired relationship name between classes. Ensure that Source Name is selected as TRACK_NUMBER class & Target Name is selected as PIPELINE class, refer image as shown below.
- Click on OK, once done application will prompt to define the next relationship between Track Number & another class (here HVAC System).
- Similarly, define the relationship name. Ensure to define correct source and target class name.
- Likewise, define next relationship name between Track Number & Equipment, Track Number & Trayline.
- Once done, under association we can see details as shown below.

- Save all the schema changes.
- We need to perform import to push these newly added changes to PlantSight imodel.
- Select workset, switch to CONNECT Services & Click on Import.
- Click on Import into Import Schema wizard. Import process must finish without any fail. Refer image as shown below.

- Once all required changes are done, load OpenPlant Modeler, define newly added association values & check-in data to PlantSight.
- Notice that to PlantSight difference dialog, it shows the newly defined association value as Added, refer image below.
- Also, to PlantSight visualizer node we can see the newly added association node in breakdown structure as shown below.
See Also
Still a Problem?
If above problem still persists, then please create a Service Request and contact the Bentley Product Advantage group. Please include a list of all relevant details to get in depth analysis for a solution or workaround.