| Product(s): |
WaterGEMS, SewerGEMS, CivilStorm, StormCAD, PondPack, SewerCAD, HAMMER, WaterCAD, CulvertMaster, FlowMaster |
| Version(s): |
08.11.02.XX and higher |
Overview
This article explains how ProjectWise integration works with the OpenFlows applications, and what you need to do in order to integrate.
What is ProjectWise?
ProjectWise is a suite of software from Bentley Systems aimed at helping manage, find, and share CAD and geospatial content, project data, and documents. This enables you to control who has the model open and has made changes, rather than using a shared network folder (for example) which cannot control this.
Enabling ProjectWise Integration
ProjectWise integration must be enabled before the OpenFlows product can directly interact with ProjectWise.
First, ensure that the version of your OpenFlows application is compatible with your ProjectWise version. This is documented in the following article: Platform Compatibility
Note on "bitness": If you are using the 32-bit version of ProjectWise, you will need to use the 32-bit version of the OpenFlows product. You cannot use the 64-bit version of the OpenFlows product with the 32-bit version of ProjectWise.
Note on PondPack, FlowMaster and CulvertMaster: as of this writing these products use the more simplified approach by way of the File > ProjectWise menu (disregard the steps below about the XML file).
Steps to enable Integration:
Browse to C:\ProgramData\Bentley\(product name)\10\ (or "8" for V8i) and open ProjectWiseIntegrationLocalOptions.xml in text editor. Note that you may need to first run the text editor as Admin in order to have permission to save changes back to the file.
Note: for civil products (OpenRoads, OpenSite), locate the file here: C:\ProgramData\Bentley\SUDA\10
Next, find the line that sets the PWDIR variable (PWDIR="") and change it so that it refers to the directory where a supported version of the ProjectWise Explorer is installed, such as PWDIR="C:\Program Files (X86)\Bentley\ProjectWise\". If you have a 64-bit operating system, also set PWDIR64 to the path for ProjectWise, which is typically C:\Program Files\Bentley\ProjectWise.
For users with the 64-bit version the XML would look like this after the necessary changes are made;
<ProjectWiseIntegrationLocalOptions
PWDIR=""
PWDIR64="C:\Program Files\Bentley\ProjectWise"
UseCaptiveEnvironment="true"
/>
For the MicroStation platform, you must enable the ProjectWise iDesktop integration for Microstation when installing the ProjectWise Explorer client software. You can also Change the ProjectWise Explorer installation to enable this from the Windows Control Panel.
The ArcGIS platform will automatically detect an installed ProjectWise Explorer.
The AutoCAD platform does not currently support ProjectWise integration.
Once the integration is completed restart the program and go to File > Open. This should open up the ProjectWise datasource window. Enter the ProjectWise credentials for login and access to files stored will be available.
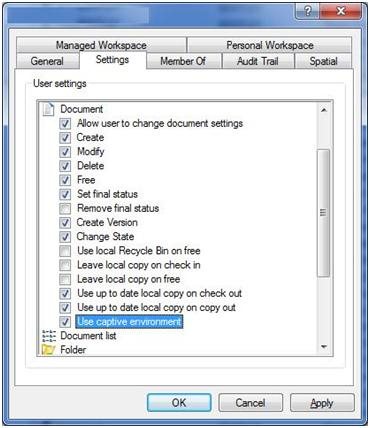
Enforcing ProjectWise use with Captive Environment
The term captive environment refers to the state of integration when the user cannot save documents to or open documents from the local file system. They are "captive" or forced to work in the ProjectWise environment.
Note that the local file open and local save dialogs can still be accessed if the user signs out of ProjectWise. Meaning, captive environment only works after the user signs into ProjectWise. The standard ProjectWise open and save dialogs will NOT open the local file open/save dialogs when cancelled, ensuring the users stay within ProjectWise.
However if the user simply double clicks a locally stored hydraulic model file (.wtg or .stsw for example) in the Windows File Explorer, it will still open in the standalone version of the OpenFlows application. However, if the user is using the MicroStation integrated environment, any files opened outside of Projectwise can be forced to be opened as read-only through setting the MS_READONLY variable, which will be respected when using the MicroStation integrated mode, as long as that variable is included in the OpenFlows application's respective workspace.
Captive Environment Setup for Users
Open ProjectWiseIntegrationLocalOptions.xml in text editor (see above for the location).
Locate the following string below on this text file and change UseCaptiveEnvironment ="true" and save it. It will read:
<ProjectWiseIntegrationLocalOptions
PWDIR="C:\Program Files (x86)\Bentley\ProjectWise"
PWDIR64="C:\Program Files\Bentley\ProjectWise"
UseCaptiveEnvironment="true"
/>
Note:
- Make sure to close out of Projectwise and the OpenFlows programs to see this change.
- Ensure captive environment is also enabled on the server side, for the ProjectWise users.
Captive Environment Setup for Administrators
Open ProjectWiseIntegrationLocalOptions.xml in text editor. It's the same file we used for the program's integration with ProjectWise and it is located on your local drive C:\Program Files\Bentley\ProjectWise\ProjectWiseIntegrationLocalOptions.xml
Locate the following string below on this text file and change UseCaptiveEnvironment ="true" and save it
<ProjectWiseIntegrationLocalOptions
PWDIR="C:\Program Files (x86)\Bentley\ProjectWise"
or for 64 bit operating systems
PWDIR64="C:\Program Files\Bentley\ProjectWise"
UseCaptiveEnvironment="true"/>
*** Make sure to close out of Projectwise and the hydraulics and hydrology program to see this change.
Spatial Reference System (SRS)
• The SRS is a standard textual name for a coordinate system or a projection, designated by various national and international standards bodies
• The primary use of the project's SRS is to create correct spatial locations when a managing a project in the ProjectWise Integration Server's spatial management system.
• The SRS name comes from the internal list of spatial reference systems that ProjectWise Spatial maintains on the ProjectWise server and is also known as the "key name." To determine the SRS key name, the administrator should browse the coordinate system dictionary in the ProjectWise administrator tool (under the Coordinate Systems node of the datasource), and add the desired coordinate system to the datasource. For example, the key name for an SRS for latitude/longitude is LL84, and the key name for the Maryland State Plane NAD 83 Feet SRS is MD83F.
Single Sign-on and Auto-login support
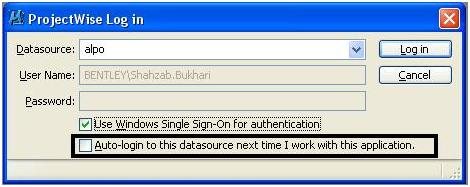
· Single Windows login allow you to login each time you open Microstation or any other platform
· Auto-login gives you option to remember the data source next time you log into this application
Document creation wizards
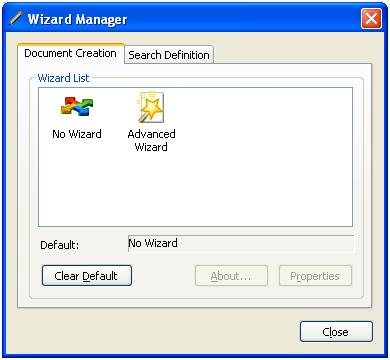
- No Wizard icon — Selecting No Wizard icon and clicking Set as Default means that the standard document creation dialog will open instead of the Advanced Document Creation Wizard. So when No Wizard is set, the Create Document dialog opens when you select Document > New > Document, and the Copy Document dialog opens when you select Document > Copy To. Also, clicking OK in the Create Multiple dialog will automatically create the specified number of documents (with no files attached), and copying or moving documents in ProjectWise Explorer using the drag and drop method will automatically perform the copy or move.
Selecting No Wizard here also ensures that if you attempt to create a new document in an integrated application, the application will open whatever ProjectWise dialog it normally uses to create new ProjectWise documents.
- Advanced Wizard icon — Selecting Advanced Wizard and clicking Set as Default means that the Advanced Document Creation Wizard will be used when creating documents. (The Advanced Document Creation Wizard Properties dialog controls which document creation actions will invoke the Advanced Document Creation Wizard.)
Selecting Advanced Wizard here also ensures that if you attempt to create a new document in an integrated application, the application will open the Advanced Document Creation Wizard.
- Clear Default / Set as Default — Clicking the Clear Default button signifies that you do not want to commit to a default document creation method. When you click Clear Default and the --no default wizard-- message appears in the dialog, this means that the Select a Wizard dialog will open whenever you select Document > New > Document, whenever you create multiple documents using the Create Multiple dialog, and whenever you copy or move documents using the drag and drop method. Clicking the Set as Default button sets whatever method (icon) you select from the list as the default method for creating documents.
Setting --no default wizard-- here also ensures that if you attempt to create a new document in an integrated application, the application will open the Select a Wizard dialog.
- About — When the Advanced Wizard icon is selected, clicking the About button opens an information box that provides — information — about the benefits of the Advanced Document Creation Wizard.
- Properties — Opens the Advanced Document Creation Wizard Properties dialog, which is used to specify which document creation actions will invoke the Advanced Document Creation Wizard, and which pages on the wizard will be hidden from the user.
Saving a model into ProjectWise
Be sure to save your model into ProjectWise (so it saves as a file set) as opposed to drag/dropping the files manually. See more here:
See Also
What is the workflow for using ProjectWise with the MicroStation integrated interface and the OpenFlows product line?
Models not opening properly from ProjectWise when manually uploaded via drag / drop
Model results not saving to ProjectWise