
Original Article Date: July 3, 2003
This tutorial has been designed to give you a terrific foundation on using AccuDraw properly and with confidence. This is a *must read* for all new users!
2004-01-07 Added a bit more on the RQ shortcut.
2006-10-03 Correct a couple of typos.
Index:
Introduction
Understanding AccuDraw's Behaviour
The Compass
Relationship to Manual Drafting
Indexing
Values in the Keyin Window
Input Focus
Positive or Negative values
Driving with the Keyboard
Change Mode
Smart Lock
X and Y Locks
Distance and Angle Locks
Locking and Unlocking the Indexing
Keying in Values the right way!
Offsetting the Origin
Rotating the Compass
Note: The graphics in this tutorial are showing MicroStation V7.
Introduction
Developed by Rob Brown, a former Bentley employee, and first introduced with PowerDraft in 1995 - AccuDraw is the one production tool that will make a difference in your day. So, rather babbling about how great it is and boring you with theory, download 150.Zip and follow along with these simple exercises. Increase your productivity today!
Depending upon the version of MicroStation you're working with, extract either AccuDraw_2D_V7.dgn or AccuDraw_2D_V8.dgn from the zip file. This two dimensional file will be used for a variety of exercises and comes with prepared saved views. To navigate to the saved views go to Utilities > Saved Views > highlight the required view > Attach. Alternatively, you can also just keyin: VI=[name_of_view];selv 1
Exercise #1 - Understanding AccuDraw's Behaviour
To really understand what AccuDraw is and how to use it, we need to explore some key concepts first. In this exercise we'll take a look at AccuDraw's behaviour and point out a few things to watch for.
To start, go to the saved view called Intro.
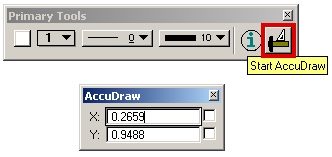
In Pre-V8 MicroStation, AccuDraw is off by default. To turn it on, poke on the AccuDraw icon as shown below and you'll be rewarded with the AccuDraw keyin window.
 |
Select Place Smartline and set the Segment Type to Lines.
Enter one datapoint at Location 1 and do not enter any more points. Just let your line hang from there for a moment while we explore what's happening on your screen.
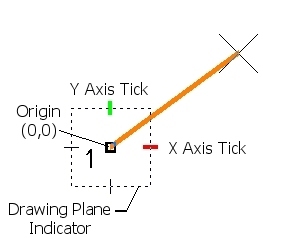
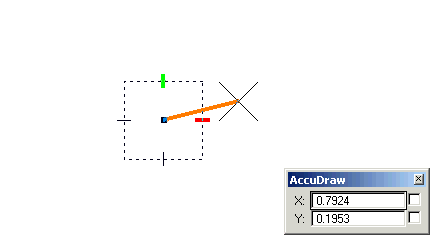
What you should be seeing is a square thingy that's landed at the datapoint you just entered. This thing is called the compass and it's made up of 3 parts:
The Origin - This is center of the compass and it's always location 0,0. (Notice that I didn't say "coordinate xy=0,0"!)
The Drawing Plane Indicator - That's the square box surrounding the origin. It's indicating to you that you are in the rectangular drawing plane. There's also a polar mode, which we'll look at later.
The Axis ticks - These are AccuDraw's X and Y axis...again, notice that I'm not referring to the design plane axis or the view axis.
 |
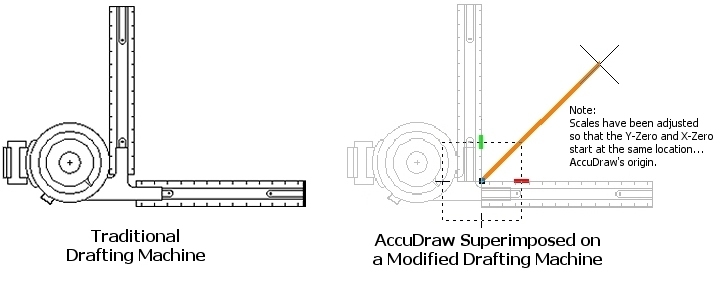
One other thing I should mention before going on, is that if you've had manual drafting experience, you'll find learning AccuDraw a cinch! In this case, think of the compass as the drafting machine and the axis as the scales. Except, in our case, we're going to extend the scales a bit so that the Y's zero and X's zero intersect. It's at this intersection that we'll put the compass. Guess the little diagram explains it better than I do.
 |
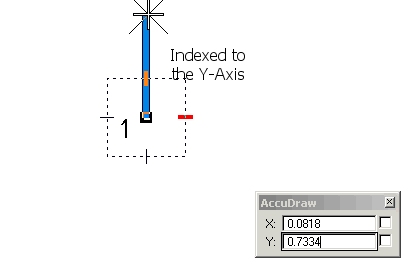
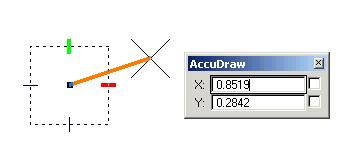
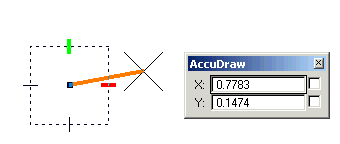
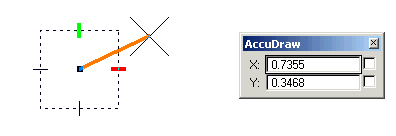
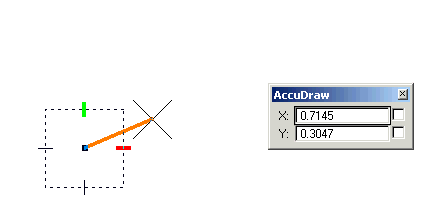
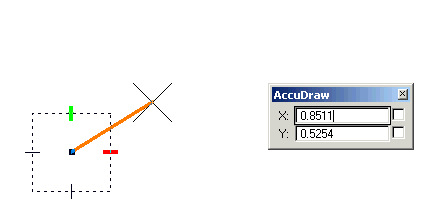
Keeping your mouse well away from the origin, move it in a counter-clockwise dirction around the outside of the compass. Now, there's a few things that are going on when you do this.
First of all, when you approach one of the axis, you kind of lock on to it. This is referred to as indexing and it's primary function is to keep you going straight.
 |
Secondly, as you move your pointer around, the values in the keyin field are changing. If you guessed that these numbers are the distances being measured from the origin (0,0) to the location of your pointer you win 10 points!
 |
Thirdly, the input focus constantly hops between the X-field and the Y-field. Guess why? If you answered that AccuDraw is always looking at the location of your pointer (with respect to the origin) and is preparing to accept a keyin, you're right and have earned another 10 points!
The fourth and final thing is that the numbers sometimes display a negative sign..again, AccuDraw is always watching the location of your pointer, and since we're in the rectangular/cartesian coordiate system, it knows that you're in a negative quadrant.
After having seen these features, you can press reset.
Putting this all together, you end up with the following....pay particular attention to: the indexing as the pointer nears an axis, the input focus auto-switching between the X and Y fields and finally, the X and Y values displaying a negative sign needed.
 |
Exercise #2 - Driving with the keyboard
At this time you have learned that AccuDraw is always watching your mouse and auto-changes the keyin field as required. The next thing to know is that AccuDraw is always in a state of alterness and is waiting for instructions via the keyboard. Known as shortcuts, these one or two character keyins simply send instructions to AccuDraw. The next few steps will highlight this concept.
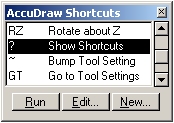
To view the delivered shortcuts, press the ? key. This dialog allows you to view, run, create and edit the shortcuts. At this time explore the shortcuts and notice that many are greyed out. If you know why, give yourself a whopping 15 points!
 |
Alright, to get you comfortable with using these shortcuts, let's explore some of the basics:
Enter one datapoint at location 1 and move your pointer away from the origin.
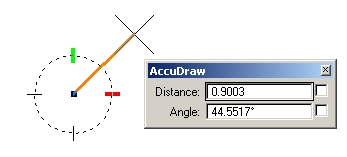
Change Mode [space bar] - Pressing the space bar, will switch the compass from rectangular to polar mode which is expressed in distance and angle. Press it a few times to see what happens and finish up in rectangular mode before going on.
 |
Smart Lock [Enter] The Smart Lock will lock you down to the nearest axis, pressing it again will unlock you. Give it a try:
Keeping your mouse away from the origin, press Enter and wiggle your cursor. Can you see that you're stuck on the nearest axis? Press it again to unlock and your cursor should now be free.
 |
X Lock [X] This shortcut locks your pointer a specific distance from the origin along the x axis.
Again, keeping your mouse away from the origin, press the x and wiggle your cursor....see how you're contstrained a particular distance away from the origin? Cool eh? On a side note, we'll talk about using specific distances in a bit....and after you test the X lock see if you can figure out the Y lock on your own. There's 5 points in it for you!
 |
Distance and Angle Locks So you've seen how to lock the X and Y, so put your thinking caps on and do the d-d-d-d-d-d-distance and a-a-a-a-angle locks on your own.
Lock Index [L] Sometimes when you're working with small values, the indexing feature can become a nuisance. To override this lock, just press the letter L. Try it for yourself.
 |
Exercise #3 - Keying in Values the Right Way
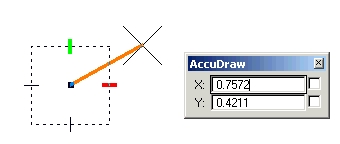
Ok, so you've experienced some of AccuDraw's behaviour and the very basics of the shortcuts. Let's take it a step further and draw a horizontal line 1.25 units long.
Staying in the same file and same view, undo any lines you may have accidentally drawn and restart Place Smartline.
Enter a datapoint at Location 1 and now move your pointer in the general direction of travel. This is a very important step since AccuDraw is always evaluating the location of the pointer and places the input focus in the correct field based on the position of the mouse to the origin.
Now, lock your line down to the X axis and take your hand off the mouse!
Move your hand onto the keyboard and press 1 and then a . followed by a 2 and finally a 5. Notice how these three numbers are auto-entered into the X field? Notice that I didn't instruct you to wipe out the existing numbers? As long as the input focus is in the correct field, just keyin the new values. That's it. That's all.
Enter a datapoint to secure this value as the endpoint of the line. Notice that compass moves to this point. In other words, you can expect the compass to always be located at the last datapoint.
Reset
 |
You may have noticed that we've used the Smart Lock to lock the line down to the X axis, but this is an entirely optional step. Undo what you've done and redraw the line using the indexing feature. Note that this method will require you to balance the mouse on the X axis once it's been indexed. It takes a bit of practise but will save you a few steps.
Undo any lines you may have drawn and restart the SmartLine if needed. The next thing is to draw a line using an X offset of 1.25 and Y offset of 0.65
Enter the first datapoint to start the line.
Move your pointer in the general direction of travel.
Using the keyin method you learned above, keyin 1.25 in the X field.
Arrow down or tab down or move your pointer more in the Y direction. Any of these will move the focus into the Y field.
Keyin 0.6. The line is now fully constrained.
Enter a datapoint to secure the end of the line at these offsets.
Whoa! Did ya see what happened? Not only did the compass move to the last datapoint, but it's rotated to match the angle between the last two points. More on this later.
Reset to complete.
 |
The last thing to do in this exercise is to draw a line 1.2 units long and at an angle of 20 degrees.
Undo any lines you may have drawn and restart the SmartLine tool.
Enter the first point of the line and move your pointer in the general direction of travel.
Press the spacebar to set AccuDraw to the polar mode. Note that the focus is in the distance field by default.
Enter the value 1.2 in the distance field.
Arrow or tab down to the angle field.
Enter 20 and accept with a data point.
Reset to complete.
 |
Exercise #4 - Offsetting the Origin
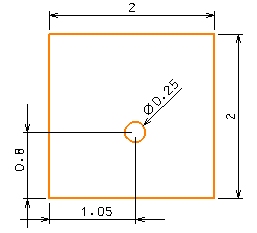
Time to kick it up a notch. Take a look at the following diagram. There's a 2x2 block with a little circle offset from the SW corner by specific values.
 |
Now ask yourself how you would position that circle. Would you draw some construction lines? Move them to the correct location and then snap to the ends? (1 point). Or, how about place the circle at the corner and then move it to the right spot? (3 points). Maybe you'd offset the tentative point? (5 points). In any case, here's an alternate method.
Go to the saved view called Origin
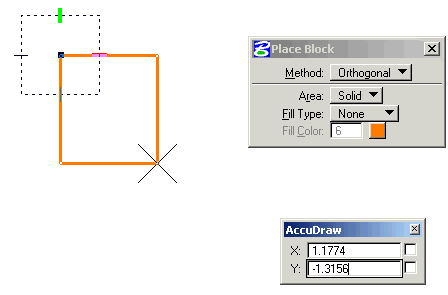
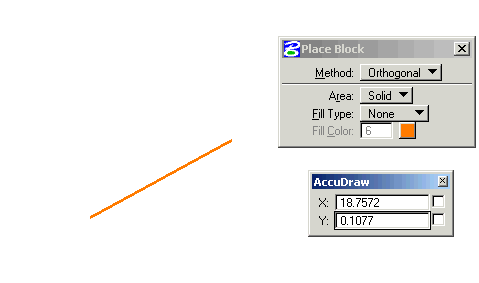
Activate Place Block and enter the first point at Location 2.
Move your pointer towards Location 3. Ensure that AccuDraw is in the rectangular mode and enter the value 2 in the X field.
Arrow or tab down to the Y field and enter 2.
Accept this location with a datapoint. Reset to complete. Voila you now have a 2x2 block.
Select Place Circle and adjust the settings to: Method=Center, Diameter=0.25.
You should have a little circle stuck to your cursor.
If you read your prompt, it will say Identify Center Point, and we know that the center is going to be offset from the SW corner of the block. So now what? Well, if you were on a drafting board, you would pick up the entire drafting machine and position it so that one of the zero marks on the scales would be positioned at the SW corner. After all, we need to scale (measure) from this point don't we?
We're going to do much the same using AccuDraw...in other words, we've got to pick up the compass (wherever it may be) and move it to the corner we're measuring from....remember the origin of the compass is (0,0).
With the circle still stuck to your cursor, snap to the SW corner of the block. Do Not Accept
Press the letter O. The compass should now be at the corner and is therefore location 0,0.
Move your cursor in the general direction of where the circles final resting place should be.
Keyin 1.05 in the X field.
Arrow or tab down and keyin 0.8 in the Y field.
Enter a datapoint to glue the circle down at this location. Reset to complete.
 |
Exercise #5 - Rotating the Compass
A couple of things to cover off here. Firstly, let's say you're on the board and have to draw a line or measure something at an offset of some degrees. Remember what you did? I do. On Vemo machines there was a button at the bottom left that you'd push in with your thumb and then turn the whole works to the needed angle. We can do much the same with AccuDraw, but this time with keyins.
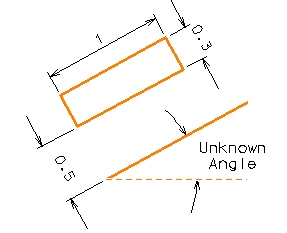
Consider the example below. Here we have a line at an unknown angle, and you need to position a 1.0 x 0.3 block at the same angle. And - the block has to be 0.5 away from the line.
 |
There are several ways of doing this - let's explore one of them using the RQ (Rotate Quick) shortcut.
Go to the saved view called Rotate.
Select Place Block and set it to Method=Orthogonal
Snap to Location 4 but do not accept.
Press O to position the compass at that point.
Press the letter R, then the letter Q. The compass will now swing to the movement of your mouse.
Snap and accept the other end of the line. The compass is now rotated to the same angle as the line.
Move your pointer along the Y axis and keyin 0.5. This will be the start point of the block so enter a datapoint.
Move your cursor to the opposite corner and keyin 1.0 in the X field and 0.3 in the Y field.
Enter a datapoint to fix this as the other corner of the block. Reset to complete.
The entire sequence should look something like this:
 |
Note: As mentioned, there are several methods of utilizing the RQ keyin. Here's an alternative that's a bit faster and eliminates a datapoint. With thanks to Brent James for pointing this out!
Position the compass on the end of the line.
Snap to the opposite end of the line, but don't accept it.
Now, press RQ
The compass is now rotated to the same angle as the line.
Once you understand the functionality of the RQ keyin, you'll probably find additional methods of how to use it. There's no right or wrong way - just do what you need to do to minimize or eliminate the need for construction lines.
Another method for rotating the compass is to use the shortcut letter V. Again, going back to the board for a moment. If you had rotated your scales to be at an angle, you could easily reset them to be horizontal/vertical by depressing the thumb button and rotating the unit accordingly. As you've just learned, you can use the RQ shortcut to do much the same with AccuDraw.
But wait! What do you do if you need to reset the compass back to it's original orientation in the middle of a command? Take the following sequence of steps: You draw a line at any old angle, and the compass rotates to the angle between the last two datapoints. Now how do you set it back to normal without pressing reset and restarting the command? Well, if you have not rotated your view, you would use the letter V as shown below.
 |
What this is doing is resetting the compass so that it's parallel with the monitor. Pretty easy to understand with the following diagram.
To practise this in the supplied exercise file, use the same view and delete any line work you may have already drawn.
Draw a line at any old angle.
Press V to spin the compass back to it's normal orientation.
Continue drawing a horizontal line.
Now, do the same thing except this time rotate your view first. What happened this time when you press V?
Stay tuned...more to come.
AskInga Article #150