
Original Article Date: Feb 5, 2001
Learn how to place elements at absolute coordinates using MicroStation's precision input.
2001-02-05 Titled Understanding Precision Input.
2003-12-16 Updated for clarity and added a bit about V8.5.
2007-02-15 Updated for clarity
Learn how to place elements at absolute coordinates using MicroStation's precision input. This article used to be called Understanding Precision Input and was originally posted 2001-02-05.
Updated 2003-12-16 For clarity and also added a bit about V8.5
Here are three methods for using MicroStation's precision input:
Method #1 – Using the XY= keyin
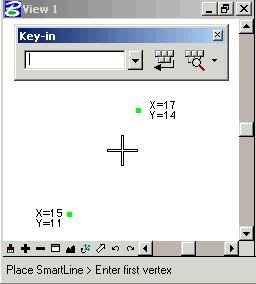
Select your element placement tool.
The images and instructions below are based on the Place SmartLine tool.
The prompt will read: Enter first point
Go to the keyin window and keyin: XY=X-value,Y-value.
For example: XY=15,11
The first vertex is now anchored at that absolute location.
The prompt now reads: Enter end point
Just keyin your absolute coordinates.
For example: XY=17,14
Continue placing points in this manner.
When done press the Reset to complete.
If you can't find the element on your screen, do a Fit View.
Snap to the ends of the element to verify its placement.
The coordinates will appear in the status bar.
 |
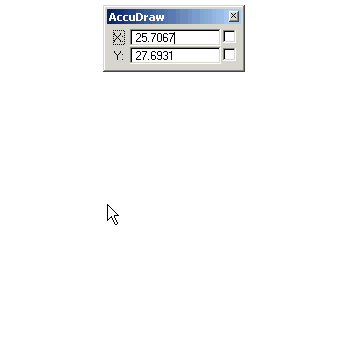
Method #2 – Using AccuDraw
You can also use AccuDraw's precision input window:
Select your placement tool.
Press the letter M on the keyboard.
This will open a dockable dialog called Data Point Keyin.
Select the input type from the pick list and enter your values.
This dialog will only open if AccuDraw has the input focus when you press the letter M. Also, it will remain open on your screen until you close it. For single coordinate keyins, press the letter P. It will bring up the same dialog but will be dismissed it after entering one keyin.
This same dialog is available for use without AccuDraw.
Just key in point keyin single or point keyin multiple and dock for easy access!
 |
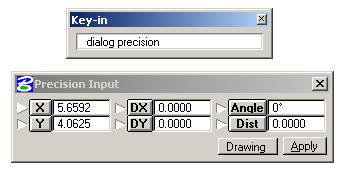
Method #3 – Using the Precision Input dialog
Not available in V8!
The last method available to you is to use the Precision Input dialog which you can activate with the dialog precision keyin. From there, it's just a matter of keying in your coordinate values and poking the Apply button.
 |
Note about V8.5
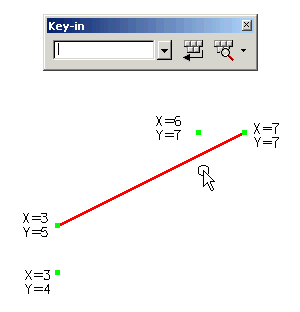
MicroStation V8.5 has a new syntax for the XY= keyin that allows for relative coordinates. This is accomplished by the use of # which instructs MicroStation to keep the value relative, or rather - keep the current value of the coordinate.
The syntax for using # with the XY= keyin is:
# leaves the coordinate X, Y, or Z value as is.
#10 adds 10 to the current value of the X, Y or Z coordinate.
#-10 subtracts 10 from the current value of the X, Y or Z coordinate.
For example, you have a line with a vertex at XY=6,7 and you wish to move it to XY=7,7.
Just keyin XY=7,# which will move the vertex to absolute X of 7 and leave the Y as is.
Another example:
To add 10 units to the existing X and leave the Y as is, the keyin would be XY=#10,#
Or, to subtract 5 units from the Y and leave the X as is: XY=#,#-5
Likewise:
XY=#,10 (2D) keep the same x value, but make the y value 10.
XY=#,10 (3D) keep the same X value, but make the Y value 10, and the Z value 0.
XY=#,#10 (2D) keep the same X value but add 10 to the Y coordinate.
XY=#-10,#20 (2D) subtract 10 from the X coordinate and add 20 to the Y coordinate.
XY=#10,#10,50 (3D) add 10 to the X and Y coordinates and make the Z coordinate 50.
Note: the # does not work for the point distance command since it would require MicroStation to remember/store the distance from the last two datapoints.
With many thanks to Barry Bentley and Gino Cortesi for sharing this tip on the discussion groups.
 |
AskInga Article #18