
Original Article Date: July 3, 2002
Ever wonder if your mouse could do more than just enter data points, tentative points and resets? Well, it can! Follow along with this tutorial and increase your productivity almost immediately!
2003-11-26 Updated to include the customization of program specific button assignements. With special thanks to Bentley's Rudi Wells for contributing this portion of the article!
A while back I was visiting a client site and noticed how this one fellow was just flying with his mouse! Turns out he had one of those groovy new mouses with five programmable buttons and had customized it with his favorite MicroStation commands. Anyway, I thought that it would make an interesting little tutorial for you guys out there in MicroStation land. Before I get into the meat of the article, I'd also like to thank Mr. Daniel MacNeil, Bentley's Mr. Ed Watson and Mr. Jason Gerspacher for contributing to this article. Enjoy!
To start with, we need to know a couple of things. The mouse that this article is based on is a Microsoft Optical Intellimouse with two extra programmable buttons...one on the left side and another on the right. The driver for this mouse is Microsoft's Intellipoint Version 4.0 which allows you to customize the functions of the additional buttons via a dialog.
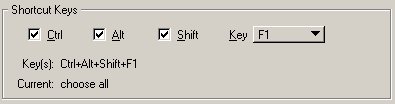
As you may already know, you can program your function keys to execute the commands of your choice. There are 12 function keys and each one has eight "levels" of activation. For example, you could configure your F1 to do the following:
- F1 = Window Area
- CTRL+F1 = Zoom In
- ALT+F1 = Zoom Out
- SHIFT+F1 = Rotate View Element
- CTRL+ALT+F1 = Fit View Extended
- CTRL+SHIFT+F1 = View Previous
- CTRL+ALT+SHIFT+F1 = View Next
- ALT+SHIFT+F1 = Pan View
 |
Now the trick is to assign two of the three alternate keys (CTRL / ALT / SHIFT) to the extra mouse buttons. For example, the ALT could be assigned to the left-side and CTRL to the right-side button. This will allow you to simply click these buttons rather than having to locate the keys on the keyboard and will give you access to a whole plethora of commands in your function key menu.
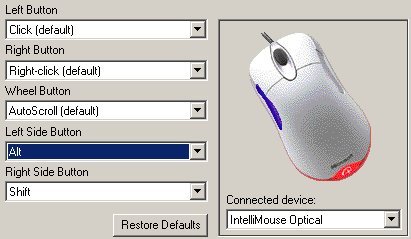 |
An alternate twist to this is to configure the extra mouse buttons to actual function keys....for example the Intellimouse allows you to use F1 and F5 as shown in the image below. By setting your mouse up this way, you can have quick and easy access to 16 commands!
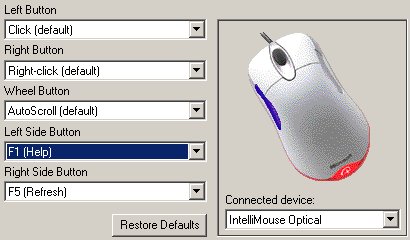 |
The nice thing about the mouse software is that Program Specific assignments can be made. This means that these button assignments will only be used in MicroStation and not with any other software. To make program specific assignments, first turn on Enable program specific button settings and then press the Settings button on the Mouse Properties dialog.
 |
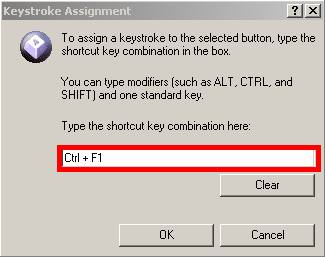
In the Advanced Button Settings dialog, select the Add button on the bottom left and locate ustation.exe.
On the other side of the dialog, select Keystroke... for the Left Side Button and in the resulting dialog, press the keystroke combination you wish to assign to that button. For example, pressing down the CTRL + F1 will assign that combination to the button. You can use the same technique for the Right Side button.
 |
So now what? Well, back in MicroStation you could assign your favorite commands to the CTRL+F1 and CTRL+F2 function keys. For example:
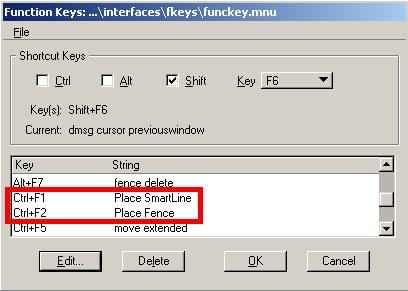 |
Rather than actually pressing these keystroke combinations, you can now just use the extra mouse buttons that were progammed specifically to execute these keystrokes in MicroStation!
Left Side button = CTRL+F1 = Place Smartline as per MicroStations function key assignments
Right Side button = CTRL+F2 = Place Fence as per MicroStations function key assignments
There are many advantages to setting up your mouse buttons this way including the following:
- The configuration of the extra mouse buttons are utilized outside of the MicroStation environment and can therefore improve your productivity and workflows in other applications.
- This method eliminates the hassel of trying to customize button assignments by using antiquated menu cells.
- The function key menu is completely portable and can easily be distributed to other users accross the corporation. Then again, you could also configure MS_FKEYMNU to point to the menu file in your project configuration.
- Function keys can also be customized to kick off actions strings, macros and the like.
- Eliminates unnecessary navigation on the user interface to find tools that you use frequently....just stick them on a function key and let your mouse strokes take care of the rest.
Now, back in the old days, we used to use a digitizing tablet in conjunction with a programmable "puck" to drive MicroStation. Most pucks had 12 buttons that you could assign any command to by attaching a menu cell to the file. In this day and age we use mice as input devices, but we can still utilize MicroStation's old technology of customizing cursor buttons to your mouse. It's also important to note, that you can only use the ALT button and/or any two button chord for activating commands on your mouse. Although this is a software limitation imposed by MicroStation, we can still benifit from increased productivity by being somewhat creative.
You'll need to create a Menu Design File which is nothing more than a normal 2D MicroStation design file that's used to draw and store the graphical menu information. It's also used to create what's called the menu cell. The menu cell is a special kind of cell that contains the menu control information such as location, range, type and function of menu blocks and cursor button assignments. Although there are a few different kinds of menu cells, we're only going to look at what's called the Cursor Button Menu Cell...since it's the type that's used to program your mouse buttons.
For what it's worth, MicroStation is delivered with a variety of menus - take a peek at the ..\Bentley\Workspace\system\menus\ folders for reference. Most of the items in there are from the olden days - before we even had PC's! (Yes, I'm actually *that* old!)
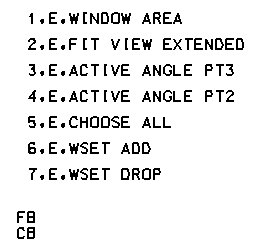
- Anyway, to get started create a new 2D design file, set your level to 63 and turn *on* your CAPS lock.
- Using the Place Text tool, enter FB,CB and place it anywhere in the file. Note that it must be a text node, and must be in caps! The FB is a special two-letter code that designates MicroStation as the application that will interpret the menu. The CB identifies that the menu cell which will be created shortly is going to be a cursor button menu cell. (In the image below I've disabled the display of Text Nodes)
 |
- The next thing to do is to key in your commands as Action Strings. Now, if your not familiar with what I'm talking about, you may want to read up on them in the following article: How to string keyins together or create keyin scripts.
The format to use for your keyin should be #,Action String,Command where the # refers to the mouse button and can be from 1 to 12. Of course your mouse probably doesn't have more than a couple of programmable buttons so you won't need to enter all 12 commands. You can position the text strings anywhere in the file.
 |
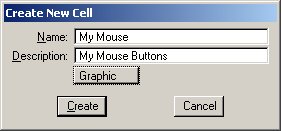
- The next thing to do is to create the menu cell. It's a good idea to store this and any other menu cells in a cell library of thier own since MicroStation uses the configuration variable MS_MENU for finding menu cells.
To make the cell, gather up the text node and the commands with a Fence or the Element Selection tool and define a cell origin which can be anywhere. You can now use the Create button in the Cell Library dialog. Enter a name and set the cell type.
For Pre-V8 ensure that the type is set to MENU or use the keyin cc=cell_name,description,m. Notice the little m for MENU.
If you're using V8 version 08.00.02.20 or 08.00.04.00, set the cell type to Graphic or use the keyin cc=cell_name,description.
 |
- You can now attach the new cell as a cusor button menu by using the keyin: AM=Cell_Name,CB (the CB stands for Cursor Button) and watch for the message Menu Successfuly Attached on the left side of the status bar.
- From the Workspace > Button Assignments dialog, you can now assign the commands to various ALT+button combinations. In this example, Cursor 1 is ALT-Left Button which has been assigned Window Area as the command...definitly a productivity boost!
 |
NOTE:
If you've done this tutorial using MicroStation V8 and can't get things to work, please try the following:
- Rather than creating you own cell library, use the delivered one called ...\system\menus\cell\msmenu.cel
- When you create your cell, ensure that it's a graphic cell not a menu cell as in earlier versions of MicroStation. (Thanks Jason - I owe you a beer for this one!)
A few suggestions from Bill Dickens:
Configure the left side button of your Intellimouse as Enter.
- This is an excellent way of invoking AccuDraw's SmartLock!
- It also allows you quick and easy access to answer a dialog question such as OK
- Use it to open the highlighted file in the MicroStation Manager a lot faster pressing the OK button manually, or worse...having to remove your hand from the mouse and manually pressing the Enter key.
- Utilize this configuration outside of MicroStation too!
Rather than setting up your cursor button cell to activate MicroStation commands, set them up to run macros which in turn can excecute commands, attach different function key menus and so forth.
Try using action stings on your buttons. For example, wset add;wset drop;update view makes a nice single-click tool.
Assign F5 to the right-side button. This will give you quick and easy access to 8 commands configured for your F5 button in your attached function key menu.
For even more great reading about programming a mouse, please be sure to read Bill's article in MSM Online. As he says: ...you’ll see that we’ll be able to play the mouse like a kazoo and we’ll be able to join the blues band and play back up harmony on the mouse. :-)
AskInga Article #57