
Original Article Date: May 12, 1999
A quick little article that discusses how to send files to a printer, edit your print driver file to bypass the Save As dialog and setting up for printing to an network printer by using the netuse command.
2005-02-18 Edited for clarity.
Sending a plot file to a printer:
Once you've created your plot file from within MicroStation, you'll need to send it to the printer. This is done by sending the following command via the system Command Prompt window:
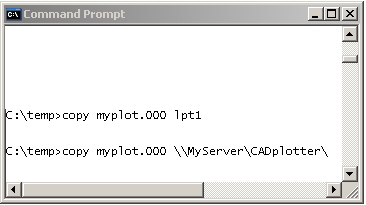
copy myplot.000 lpt1
OR
copy myplot.000 \\server\printer
 |
An alternate to useing the DOS copy command is to utilize a product such as PrintFile. This freeware utility allows you to easily send files to your printer and seems to be quite popular.
Print directly to the printer and bybass the Save As dialog:
The syntax below allows you to print directly to a network port without specifying a plotfile name or opening the Save As... plot dialog.
Using a ASCII text editor, such as Windows Notepad, open the plot driver file you use with your printer/plotter.
The delivered printer drivers are located in the following folders:
...\Bentley\Workspace\System\plotdrv\ for MicroStation V8
...\Bentley\Program\MicroStation\plotdrv\ for MicroStation/J,
...\win32app\ms95\plotdrv\ for MicroStation 95/MicroStation SE, and
...\win32app\ustation\plotcfg\ for MicroStation V5.
Locate the line that reads default_extension/auto_incExt=' 000 ' and comment it out by placing a semi-colon in front of the first character in the line. This particular line in the plot driver tells the MicroStation to provide a default extension of 000 in the Plot > Save As... dialog and to auto increment a duplicate plot file of the same name. For example:
plot.000 is the first saved plot file.
plot.001 will be the name of the second saved plot file of the same file.
Remove the semi-colon (uncomment) the line that reads: default_outFile/auto_overwrite = "LPT1". This line tells MicroStation save the plotfile directly to a specified port. The "auto_overwrite" statement automatically overwrites the file without displaying a message saying "this file already exists, do you wish to overwrite?" The statement directly after "auto_overwrite = " sign is where we can specify a port (i.e. LPT1 ) or the network location of the printer/plotter (i.e. \\pub\help ).
For example:
default_outFile/auto_overwrite = "\\printman\hp650c1"
This will save the plot out file to the network device located at \\printman\hp650c1.
Another example to plot to LPT1 would be:
; default_extension/auto_incExt = ' 000 '
; default extension for plotfiles
; To configure a default output file name comment out the default_extension
; line above and uncomment this line. "LPT1" may be substituted with any
; desired filename - e.g. "$(MS_PLTFILES)plotfile.000"
default_outFile/auto_overwrite = "LPT1"
Caution:
The delivered plot drivers should not be modified. Instead, make a copy it and place it in your standards folder. For example, in MicroStation V8, use this folder: ...\Bentley\Workspace\Standards\plotdrv\. This will prevent MicroStation from deleting your customized file in the event that it needs to be reinstalled.
Connecting to a network printer:
Use the system NET USE command to connect or disconnect a computer to a shared resource on the network such as a printer or plotter. Typing in NET USE will display the devices connected to your computer. For more information on NET USE and the syntax options,type NET USE /H. Only the options that relate to setting the plotting port are shown below:
syntax:
NET USE [devicename] [\\computername\sharename]
Where
| devicename |
|
| \\computername |
|
| \sharename |
|
For example:
NET USE LPT1 \\PRINTMAN\HP650C will return the message "command completed successfully" and set \\PRINTMAN\HP650C as the destination of the LPT1 port for that machine.
Another example, using Banyon Vines Network software or Novell NetWare software with the format:
NET USE LPT1 \\LOCALHUB\PLOTQUE will return the message "command completed successfully" and set \\LOCALHUB\PLOTQUE as the destination of the LPT1 port for that machine.
The NET USE command can be added to the autoexec.bat file in both Windows NT and 95. Upon start up, the destination will be set for the specified port for that machine.
AskInga Article #21