
Original Article Date: Oct 28, 2003
Learn quick and easy methods of changing the display order of your elements
Updated: October 2005 - Fix a broken link. November 2005 Include a tip from Gerald Hernandez. July 2007 - Updated for MicroStation XM. July 2009 - Added links for MicroStation V7 and V8 versions of the change order macro by Andrei Columban. October 2010 - Review
I'm often asked how you can re-order the display of elements to satisfy viewing and plotting requirements. But before we get to the solutions, we need to understand the display order MicroStation uses. By default, MicroStation displays the elements on your screen in the order in which they were drawn. If you're using reference files, the active file will display first followed by the reference files in the order of attachement. And finally, if you're using raster reference files, the order is: the raster images first, then the active file elements, followed by the vector reference files.
In the image below, the text is partly obsured by the filled elements. We want a simple and quick solution to bring the text "to the front", or rather, move it's position in the file so that it updates last.
 |
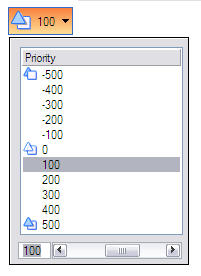
MicroStation V8 XM Edition - Use Element, Level and Reference display priority
Display priority is a technique for specifying the relative front-to-back order in which 2D elements appear when they are displayed in a view. In 2D models, you can assign display priority values to references, levels, and to individual elements. For detailed information, please refer to MicroStation's Help.
 |
MicroStation V8 2004 Edition - Use Edit > Bring to Front
In versions 08.00.07.24 and later, you can change the element order by first creating a selection set of the elements you want to bring to the front and then selecting Edit > Bring to Front. To make it even easier, just put order element front on a function key and away you go!
MicroStation V7 and V8 - Use WSET ADD;WSET DROP
This method has been around forever and is a very popular method for re-ordering the display of your elements. Pre-select the element(s) you want to 'move' with the Element Selection tool. Then just issue the key-in WSET ADD;WSET DROP. Putting this key-in on a function key makes it a snap to re-order your elements!
Bentley's Rudi Wells offers this tip: When creating the selection set, select the elements in the order you wish them to be displayed. For example, the first element selected will be furtherst back, followed by the second element selected and so forth. When you have them selected in the order you want them displayed, just run the wset add;wset drop command in V7, or use the bring to front command in V8.
NOTE: Gillis Christopher of Belgium suggests that this technique only works when you use the CHANGE_PEN=BOTH option in the plot driver file since this option scans the design file only once and plots the elements in the same order in which they were placed. When using the CHANGE_PEN=COLOR, WEIGHT or LEVEL options, MicroStation sorts through the drawing so that all elements to be plotted with the same pen are plotted one after another. That is, all elements with the same color, weight or on the same level. The pen is then changed, the file is re-scanned and the elements for the next pen are plotted...etc. If you are required to use the CHANGE_PEN=WEIGHT option, you may need to set the weight of the element you want plotted *on top* to a higher value than the element which lies underneath it. This will cause it to be scanned and plotter after the elements with a lower weight.
MicroStation V7 and V8 - Use CTRL, Pick, Pick Pick, G, U, Release
Here's another method as suggested by Gerald Hernandez. Select the elements individually into a selection set, in the order you want them displayed. (First element on bottom, last element on top). Add them to a group with CTRL+G. Then drop the group with CTRL+U and release the selection set. So thats...Press and hold the CTRL key, pick an element, pick an element, pick an element, G, U, let go of the CTRL key and finally, release the selection set. Done. Preso. Finito. Note, this can be done to send elements to the back as well...it's all in the picking order!
 |
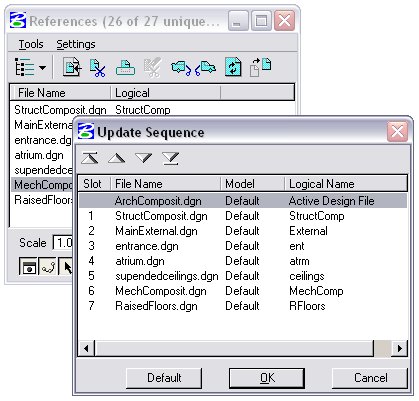
MicroStation V7 and V8: Split your data into references
By splitting your data into separate files and attaching as references, you'll be able to control the display order via Settings > Update Sequence from the Reference dialog.
 |
MicroStation V7 and V8: Reference the file to itself
Putting your elements in separate files just for display and purposes may be a bit absurd...so why not do as Mr. Mark Neuhaus (Oregon Department of Geology and Mineral Industries) suggests and simply level separate your data. Then just attach the file to itself multiple times and adjust the display of the levels. If further adjustments are required, modify the reference files Update Sequence as shown above. You may find this technique easier to manage since you're only dealing with one design file.
MicroStation V7 - Use the CHGORDER macro
If you can find it, take a look at Andrei Columban's macro called CHGORDER. This little gem gives you the option of moving your selected element(s) so that they lie either in front of or behind the remaining elements.
Available from http://www.markstefanchuk.com/downloads/chgOrder.zip
MicroStation V8 - Use the ChgOrderV8 macro
The same as above but updated for V8.
Available from http://www.markstefanchuk.com/downloads/chgorderv8.zip
MicroStation V7 and V8: Use a Pen Table
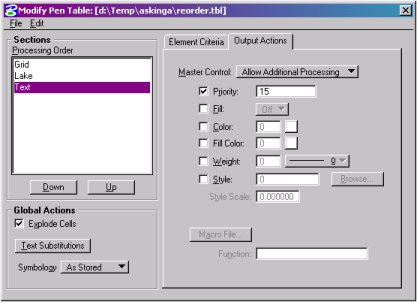
By writing a quick pentable, you can easily change the plot order of elements. Note that this method only affects the plotting and not the actual design file itself. In the example below, I want to re-arrange the graphics so that the text plots last and the grid lines plot first.
 |
Creating and modifying Pen Tables can be done via the Plot dialog:
 |
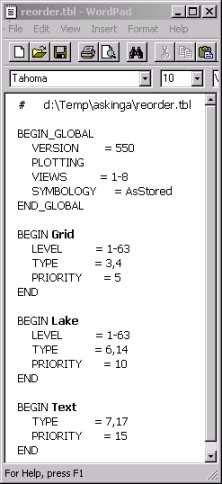
Or you can use a text editor:
 |
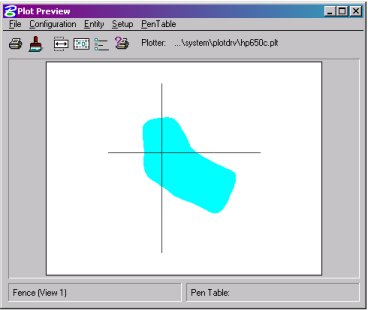
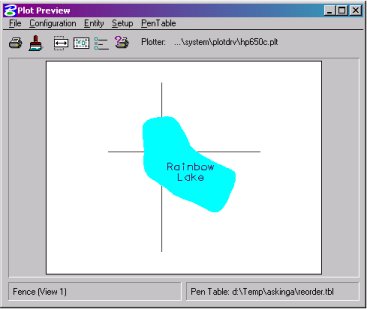
The results of using a Pen Table are obvious in the Plot Preview dialog:
 |
For MicroStation GeoGraphics Users:
With many thanks to Bentley's Kees van Prooijen who pointed out this little gem!
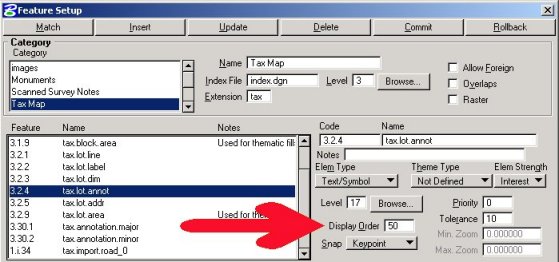
MicroStation GeoGraphics has a slick little tool that can re-write the element order of a design file. Available only as a keyin, FENCE SORT DISPLAY rewrites the elements based on element type, area, and the feature display order. When dealing with the element type - this command will display shapes based on size...that is, the larger shapes will display before smaller shapes. Once the shapes are processed, it will display linear and text elements.
When dealing with elements that have a defined 'Feature Display Order', the feature with the lowest number will drawn first followed by those with higher numbers. If two elements have the same Feature Display Order, MicroStation GeoGraphics will draw the area elements first, the linear elements second, and point elements (cells and text) third. Additionally, the larger areas will be drawn before the smaller ones.
For more information, refer to GeoGraphics Help.
 |
AskInga Article #50