
| | | | |
| | Applies To | | |
| | | | |
| | Product(s): | MicroStation Raster Manager | |
| | Version(s): | 08.09.02.XX and newer | |
| | Environment: | N/A | |
| | Area: | N/A | |
| | Subarea: | N/A | |
| | Original Author: | Jason Gingrich, Bentley Technical Support Group | |
| | | | |
Overview
Raster Manager
The Raster Manager utility gives you the ability to control and manipulate raster images within Microstation.
Starting in Microstation XM and continuing in Microstation V8i, raster attachments are treated as any standard element with regard to level-related operations, such as being placed on a level, display, Freeze, Lock, Plot, and Viewport Freeze.
New Raster Attachments
By default a raster is placed on the current active level when it is attached. This can be changed in Microstation XM at workspace > preferences > raster manager > general > Default Raster Attributes.
Click in the checkbox next to level to toggle this option on. Then click on the list on the right and all levels in the current dgn file will display. You can choose one of them or select new and enter a new level name. Hit OK to exit the dialog. Now when a raster is attached it will attach to the level you have selected and if the level is not in the current dgn file it will be created when the raster is attached and the raster image will be placed on that level. See the Microstation XM preferences below.
In Microstation V8i go to workspace > preferences > raster manager > Default Attributes > Set Default Attributes > General. Here you’ll find the Level setting. You can click in the list to the right of Level and pick a level in the current dgn file or clear the level listed and type in a new name. See the V8i preferences below.
Current Raster attachments for dgn files coming from previous versions of Microstation
If you have a dgn file with raster attachments that has never been opened in MSXM or V8i all raster attachments are placed on the current active level. To change this go to workspace > configuration and scroll through the variable on the right side to find the variable MS_RASTER_DEFAULT_LEVEL. Select it and click edit. In the New Value field input a level name. If the level is present in the dgn file the images will be placed on it. If the level is not currently in the dgn file it will be created and the attached raster images will be placed on the level.
Check what level a raster attachment is currently on
There are three simple ways to check which level a raster attachment is on.
1. You can hover your mouse over the border of the image in the view and it will display the image name along with the level name. It will be in the form of LEVEL: Raster, where Raster is the level name.
2. Double click on the image name in raster manager to get the Element Information box for the image to display. In the General section it will list the level.
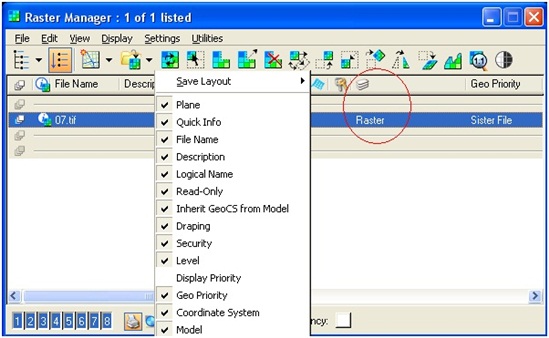
3. In raster manager there is a column that will list the level for each raster attachment. This column can be toggled on/off in raster manager by right clicking on the title bar just about the attached raster images’ names. The bar will have “file name”, “description”, “logical name”, and other options listed. Right anywhere on this bar to get a list of available columns. Check level and the level column will display. See screenshot below.
External Links
Bentley Technical Support KnowledgeBase
Bentley LEARN Server
Comments or Corrections?
Bentley's Technical Support Group requests that you please submit any comments you have on this Wiki article in the "Comments" area below. THANK YOU!