| Product(s): | SELECTserver | ||
| Version(s): | N/A | ||
| Environment: | Windows XP 32 bit,Windows XP 64 bit,Windows Server 2003,Windows Vista 32 bit,Windows Vista 64 bit,Windows 7 32 bit,Windows 7 64 bit,Window Server 2008 64 bit,Windows Server 2008 R2 | ||
| Area: | Installation / Configuration | ||
| Subarea: | SQL Management |
The following support solution provides instructions for moving a SELECTserver license database from one server to another using a free database utility named SQL Server Management Studio.
Background
A license database includes historical usage data and various license settings such as temporary activation keys, custom activation groups, and client access restrictions. When installing SELECTserver on a new server, the license database can be copied over and used as an alternative to creating a new license database.
The instructions below, while detailed, are best performed by a system administrator with knowledge of SQL Server databases.
Steps to Accomplish
Installing SQL Server Management Studio (if needed)
If the old server is running an Express edition of SQL Server, then SQL Server Management Studio must be installed. These instructions will use SQL Server 2008 Management Studio, but any version that is the same version or higher will be sufficient. Standard and Enterprise editions of SQL Server should include it already. The following installation instructions posted on a Microsoft blog provide a helpful reference for navigating the various screens of the installer.
Backing up the database
- Open SQL Server Management Studio.
- In the window that appears, enter server and instance name and any credentials to access the database. For a database locally created by the SELECTserver installer, a server name of ".\SELECTserver" with Windows Authentication selected should work.
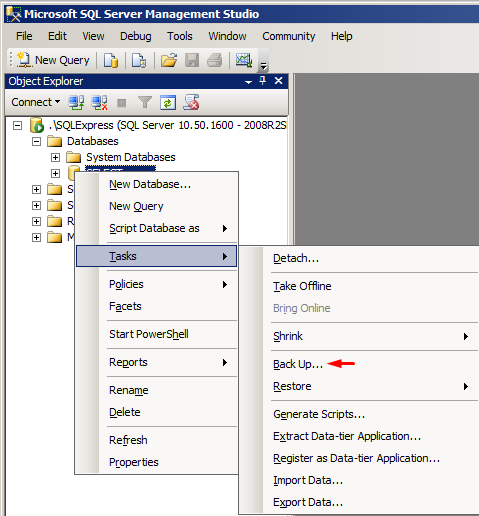
- In the Object Explorer on the left edge, expand the Databases folder, right-click on the license database to move, and select Tasks -> Backup from the contextual menu.

- In the window that appears, note that file path in the Destination section at the bottom. Click the OK button to generate a BAK file, and then navigate to this location to retrieve it.
- A BAK file can be rather large (i.e. several gigabytes). So compressing the BAK file in a zip or 7-zip archive prior to transferring is recommended.
Restoring the database
- On the new server, copy the BAK file to a location accessible by an administrator, and expand it if compressed.
- If the new server is running an Express edition of SQL Server, install SQL Server Management Studio.
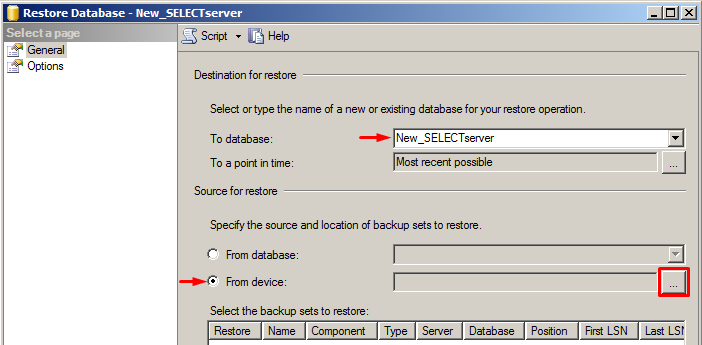
- Open SQL Server Management Studio, right-click on the Databases folder, and select Restore Database from the contextual menu.
- In the Destination section, specify a name for the license database. It can be different than the database name on the old server if necessary.

- In the Restore section, select the From Device radio button, and click the button with the elipse to specify a file.
- Click the Add button, select the BAK file, and click the OK button.
- Depending on the version of SQL Server installed, backup sets may need to be explicitly selected in the Restore Column before proceeding.
- Click the OK button to restore the database file.
- If successful, the new license database will appear under the Databases folder.
Configuring SELECTserver to use the restored database
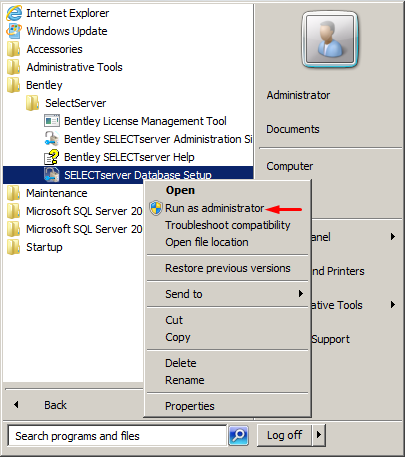
- From the Windows Start menu select:
All Programs -> Bentley -> SelectServer - Unless running Windows XP or Windows Server 2003, right-click on SELECTserver Database Setup, and select Run As Administrator from the contextual menu. Otherwise, just select SELECTserver Database Setup normally.

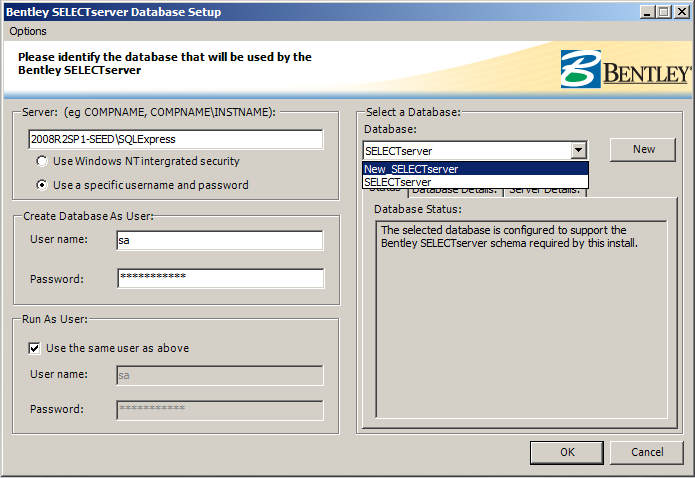
- Select the restored database from the Database drop-down menu, and click the OK button. If a connection string error occurs instead, ensure that the server name and login credentials are entered correctly.

Other Language Sources
See Also
Database Setup Tool Configuration and Explanation [FAQ]
| Original Author: | Jeremy Hoesly |